
Quick Start – Instantly Play Your DVD
Ace DVD automatically detects inserted DVD (and other disc) types and prepares them for instant playback.
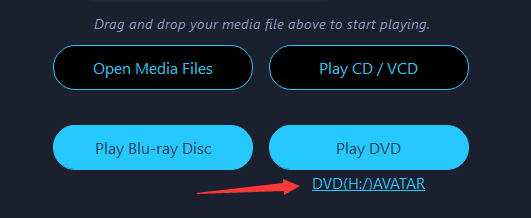
The label of the currently loaded DVD is displayed underneath the “Play DVD” button.
- Click the “Play DVD” button to start playing the DVD.
- Alternatively, click the underlined DVD label to review and select another DVD disc, especially if your PC has multiple disc R/W drives.
With either method, Ace DVD ensures you can instantly enjoy disc playback.
Learn more options about how to play DVD and Blu-ray discs.
Launch the Ace DVD App
To start using Ace DVD, follow these simple steps:
Press the Windows Start key
 on your keyboard.
Type “Ace DVD” in the search bar.
From the list of matching entries, locate the application starting with “Ace DVD“
Click the Ace DVD application with this icon:

The app will be launched with its main screen shown below:
Now you’re ready to explore the features and enjoy your DVD watching experience with Ace DVD.
User Interface Overview
Ace DVD has been designed with a user-friendly interface to streamline the process of playing and enjoying various media types, including DVD movies, MP3 songs, audio CDs, and video clips.
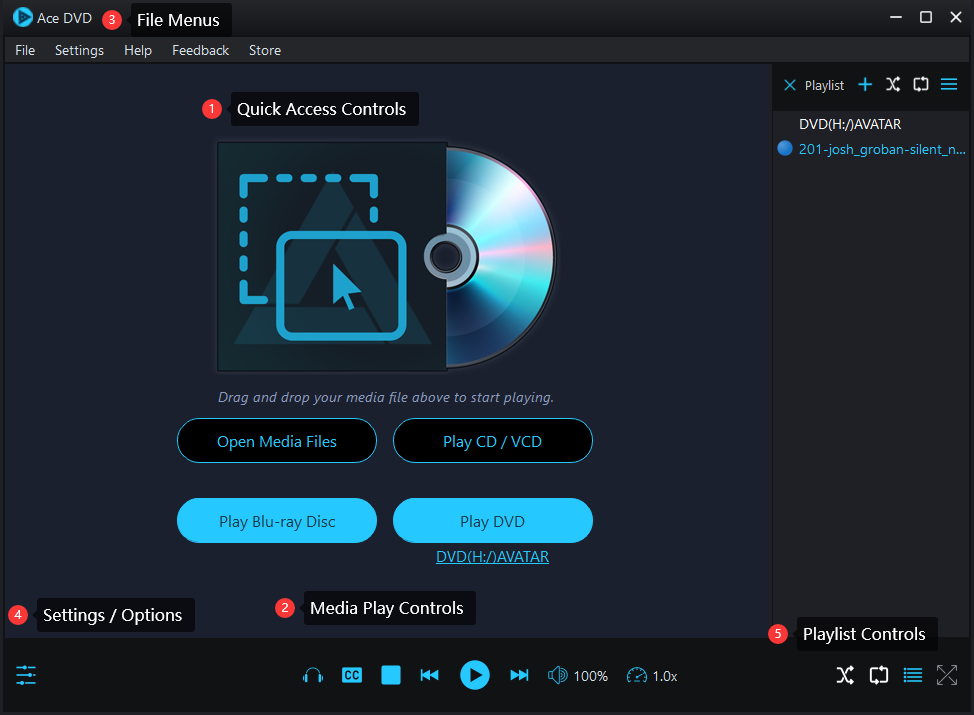
Here is a quick overview of its user interface, referring to the numbered sections corresponding to each function button group.
1. Quick Access Entries
At the center of the main window, you’ll find quick access entries for loading different types of media:
- Media Files: Load various media files.
- CD/VCD: Play audio CDs or Video CDs.
- Blu-ray Disc: Insert a Blu-ray disc for playback.
- DVD: Start playing a DVD.
Simply use these buttons or drag-and-drop a media file onto the area featuring a Blu-ray disc jacket art to initiate playback.
How to Open Media Files
You can open and play media files in three ways:
1. File Menu:
Navigate to the File menu.
Select the type of media file you want to play.
Use the Browse for File dialog box to open and play the selected media.
Note: For CD, VCD, DVD, and Blu-ray discs, the app automatically detects matching media and presents your choices in a pop-out menu.
2. Drag-n-Drop:
- Open Windows Explorer and locate the audio or video file.
- Drag-and-drop the media file onto the main window of the app.
3. Quick Access Buttons:
- Use the Quick Access buttons by following these steps:
- Open Media Files: Select this option for individual files.
- Play CD / VCD: Click this button for playing audio or video CDs.
- Play DVD: Choose this option for DVD playback.
- Play Blu-ray Disc: Select this button for playing Blu-ray discs.
Play Media Files: the Basics
The following media play controls apply to playing all types of media files:
Play, Pause, or Stop
![]()
Play Button: Click the Play button to start or resume playing the current media. The button transforms into a Pause button once the media begins playing.
Pause Button: Click the Pause button
 to temporarily halt playback.
Stop Button (far left): Use the Stop button to cease playing the media altogether.
Navigate to Previous or Next Media
- Double Chevron Buttons (to the left and right of the Play/Pause button): Utilize these buttons to navigate to the previous or next media item in the Playlist.
Track Slider
![]()
The track slider, positioned above the control buttons, serves as a visual indicator of the media file’s progress. Here’s how to use it effectively:
Dragging Left: Move the slider to the left to rewind the track being played.
Dragging Right: Shift the slider to the right to fast-forward the track.
Additionally:
Left Timer: Indicates the current playing position of the track.
Right Timer: Displays the total time of the current track.
Volume Control
![]()
To adjust the volume in Ace DVD, follow these steps:
Click on the speaker icon located to the right of the Play controls.
A volume adjustment slider will appear, allowing you to set the volume from 0 (mute) to 100% of the current system volume.
Note: The app’s volume control operates independently and does not affect the system’s volume control. It is designed to stay within the boundaries of the current system volume; therefore, it won’t exceed the system’s set volume level.
Playback Speed Control
![]()
Adjusting the playback speed in Ace DVD is straightforward using the Playback Speed Control, represented by a speedometer icon. Follow these steps:
Locate the Playback Speed Control:
- Find the Playback Speed Control icon, resembling a speedometer.
Select Your Desired Speed:
- Click on the Playback Speed Control, and a list of presets ranging from 0.25x to 10.0x will appear.
Choose the Playback Speed:
- Select the desired speed from the list. The default value is 1.0x, representing the normal playback speed.
Play DVD and Blu-ray Discs
In this section, we use DVD for illustration as the functions between playing DVD and Blu-ray discs are almost identical.
Open DVD for Playback
To open and play a loaded DVD in Ace DVD, choose one of the following methods:
Method 1: Instant Play
Ace DVD automatically detects inserted DVD (and other disc) types and prepares them for instant playback.
The label of the currently loaded DVD is displayed underneath the “Play DVD” button.
- Click the “Play DVD” button to start playing the DVD.
- Alternatively, click the underlined DVD label to review and select another DVD disc, especially if your PC has multiple disc R/W drives.
With either method, Ace DVD ensures you can instantly enjoy disc playback.
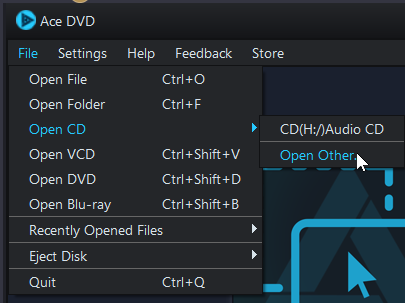
Method 2: From the Top Menu
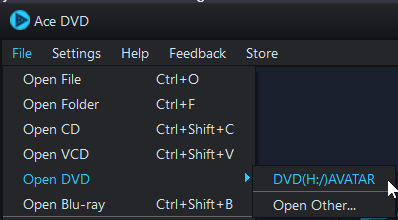
- Navigate to the top menu.
- Select File > Open DVD.
- Choose the detected DVD title for playback.
- Alternatively, pick another DVD by selecting Open Another…
- Select the preferred DVD drive.
- Click Select Folder.
Control DVD Playback
![]()
Utilize the Disc Play Controls in Ace DVD to effectively manage DVD playback. The buttons, arranged from left to right, offer convenient options:
DVD Menu:
- Displays a list of tracks on the CD.
- Select any track from the menu to initiate playback.
Eject Disc:
- Ejects the CD from the drive when clicked.
- Use this button when you want to remove the CD from the drive.
Previous Chapter:
- Plays the previous sound track on the CD.
- Useful for navigating to the preceding track in your CD.
Next Chapter:
- Plays the next sound track on the CD.
- Convenient for moving to the next track in your CD sequence.
Play DVD in Full-Screen Mode
Toggle the player into full-screen mode by clicking the Full-screen mode button located at the bottom-right corner of the window.
To exit full-screen mode, simply press the Esc key.
DVD Audio Track and Subtitles
To manage audio tracks and subtitles in Ace DVD, use the buttons to the left of the Play Control buttons.
Audio Track
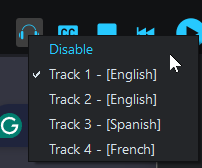
- Click the headphone icon to access the audio track menu.
- Select an audio track from the menu or click the Disable option to turn off audio.
Subtitles
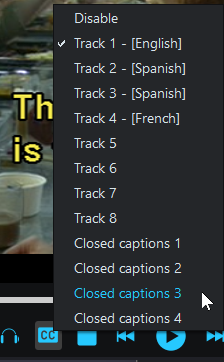
- Click the [CC] subtitle icon to access the subtitle menu.
- Choose a subtitle option from the menu or click the Disable option to turn off subtitles.
Access DVD Titles, Chapters, and Disc Menu
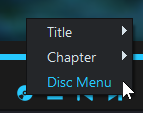
When a DVD is located, you can access its Disc Menu (root menu), titles, and chapters from the DVD Menu button as shown above.
Title:
- Definition: A title on a DVD is essentially a main section or segment of the content. DVDs are divided into titles, and each title can represent a different part of the overall content, such as a main feature, a bonus feature, or a special segment.
- Functionality: When you play a DVD in Ace DVD, you can often select the title you want to watch. This allows you to choose between different sections or features available on the DVD.
Chapter:
- Definition: A chapter is a smaller division within a title. Each title can be further subdivided into chapters, which are often used to represent specific scenes or segments within the larger title.
- Functionality: Chapters are useful for navigation, allowing you to jump to specific points within a title. This is beneficial when you want to skip to a particular scene or segment without watching the entire title.
- Disc Menu:
- Definition: The DVD menu is an interactive graphical interface that appears on the screen when a user plays a DVD. It presents a navigational structure that allows users to access different sections, titles, chapters, and features available on the DVD. The DVD menu is an essential component for controlling and customizing the playback experience.
- Functionality: The DVD menu offers users the ability to select titles, navigate chapters, control playback, access submenus, utilize interactive elements, explore special features, and return to the root menu.
Play CD
Open CD for Playback
To open and play a loaded CD in Ace DVD, choose one of the following methods:
Method 1: From the Top Menu
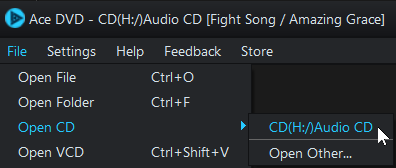
- Navigate to the top menu.
- Select File > Open CD.
- Choose the detected CD title for playback.
- Alternatively, pick another CD by selecting Open Another…
- Select the preferred CD drive.
- Click Select Folder.
Method 2: From the Main Interface
- Click the Play CD / VCD button on the main interface.
- Select the preferred CD drive.
- Click Select Folder.
Control CD Playback
![]()
Utilize the Disc Play Controls in Ace DVD to effectively manage CD playback. The buttons, arranged from left to right, offer convenient options:
CD Menu:
- Displays a list of tracks on the CD.
- Select any track from the menu to initiate playback.
Eject Disc:
- Ejects the CD from the drive when clicked.
- Use this button when you want to remove the CD from the drive.
Previous Chapter:
- Plays the previous sound track on the CD.
- Useful for navigating to the preceding track in your CD.
Next Chapter:
- Plays the next sound track on the CD.
- Convenient for moving to the next track in your CD sequence.
The Playlist
Ace DVD offers a user-friendly Playlist control for managing multiple media file selections and playback sequences.
Note: The app currently does not support the features of opening, creating, or saving playlists. Our team is actively developing these functionalities, and they will be released as soon as possible. We appreciate your understanding and support during this process.
Open the Playlist
Open the Playlist Control:
- Click the Playlist button
 , located as the second button from the right on the bottom toolbar.
- Click the Playlist button
Close the Playlist Control:
- To close the Playlist, click the [X] button
 on the Playlist title bar.
- To close the Playlist, click the [X] button
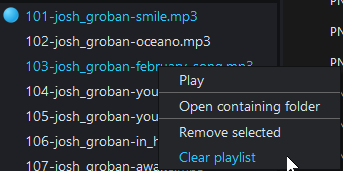
Play Media from Playlist:
- Double-click the media or right-mouse click and select “Play” to initiate playback directly from the Playlist.
Access Playlist Functions
All Playlist functions can be accessed from two options:
- From the Playlist Control menu:
- Click the hamburger icon on the Playlist Control title bar
- From the context menu of each individual media file
- Right-mouse click a media file from the Playlist
Add or Remove Media Files
Add Media to Playlist:
- Use the Add File button (the Plus Sign + ) from the Playlist Control to add one or more files to the bottom of the Playlist.
- Use the File > Open File function to select and add an audio or video file to the Playlist.
- Use the File > Open Folder function to select a folder and add all media file to the Playlist.
Remove Media from Playlist:
- Right-click on the media file to be removed and select “Remove Selected.”
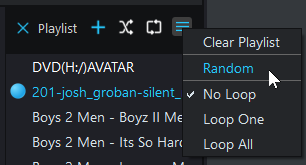
Clear Entire Playlist:
- Click the hamburger menu at the top-right corner of the Playlist control and select “Clear Playlist” to remove all entries.
Loop and Shuffle
Loop Modes
Ace DVD provides three loop modes, as indicated by the icon set below:
![]()
No Loop:
- The media plays from start to finish without any repetition.
Loop Once:
- The media repeats its playback, but stops looping after completing a single iteration.
Loop All:
- The entire playlist of files continuously repeats in sequence.
Random Modes
![]()
There are two random modes: Play Sequentially or No Random and Shuffle Randomly, as indicated by the icon set shown above.
No Random (Sequential or Ordered):
- Plays items in a predefined sequence, maintaining the order of the playlist or library.
Random Shuffle:
- Plays items randomly from the playlist, introducing variety and unpredictability.
Settings and Options
Ace DVD offers some useful settings and options that help personalize your app experience.
The Settings menu
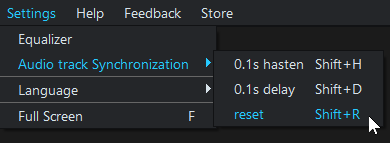
Click Settings from the file menu at the top to open the Settings menu, which provides access to the following options:
- Open the Equalizer dialog box
- Audio Track Synchronization: to make audio consistently play later or ahead of the video
- Delay: add 0.1 second to the current delay value
- Hasten: add 0.1 second to the current hasten value
- Reset: cancel audio synchronization
- Language selection
- Select a language and relaunch the app to take effect
- More language pack will be added in the near future
- Full Screen mode
- Turn on the full-screen mode
The File Menus
Besides Open Files, and Open CD, VCD, DVD, and Blu-ray discs, more features can be accessed from the File menu at the top.
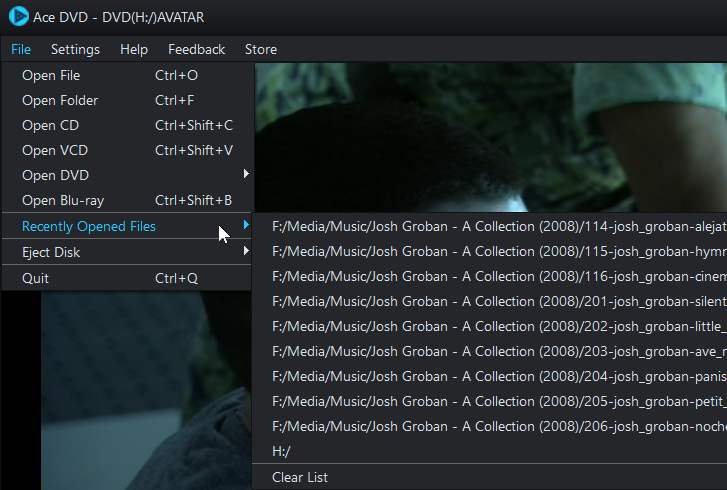
- Open Folder: add all media files from a folder to the Playlist
- Recently Opened Files: provides a list of 10 files that have been most recently opened.
- Use the Clear List menu item to clear the entire list
- Quit: closes and exits the app